Search
Categories
Have a request?
This form does not yet contain any fields.


    Entries in kitchen experiments (26)

    Tuesday
    Sep252012

    ice cream flavoured cake

    would be even better with ice cream.

    But I was out of ice cream, which is why I made the cake. Well, that and I'd managed to make it around the sun one more time.

    So, you've seen me make mint chocolate chip ice cream. Definitely one of my favourites. Last weekend was the time of year for cake, and so I made a mint chocolate chip cake. And since I have trained my offspring to be aware of food additives, he insisted that we make it without artificial colors or flavours. Which apparently meant I was not allowed to use mint extract either. Had to be mint-mint.

    Okay.

    I can do that.

    Mint Chocolate Chip Cake

    What you need:

    • about 2 c mint
    • 2/3 c milk
    • 1/3 c butter
    • 3/4 c sugar
    • more mint (about 1 tbsp once it's all chopped)
    • 1 egg
    • 1 tsp vanilla (which was allowed for some reason)
    • 2 tsp baking powder
    • 1/4 tsp salt
    • 1 generous cup of flour
    • 1 c mini chocolate chips (they're in the other pictures)

    What you gotta do:

    Don't preheat your oven yet. We've got an extra step at the beginning here. Since I wasn't allowed to use a mint extract, even a non-artificial one, I had to make one of my own.

    So, I took a step from the ice cream recipe. Trim and rinse the mint, and put it in a pot with the milk.

    You will barely be able to see the milk under all the mint. Don't worry, it's still there. And the mint will cook down like all leafy green things.

    Bring this just barely to a simmer, stir it, cover it, and leave it alone for about half an hour.

    Set the butter and egg on the counter to warm up to room temperature while the mint milk is steeping.

    Once you've strained and squeezed the mint out, the milk will be just barely green.

    Not quite green enough to colour a cake. Which is where the other bit of mint comes in. Chiffonade and then cut that up a bit more.

    Cream the butter, sugar, and minced mint together.

    I was hoping that creaming the mint in with the sugar would mash it up a bit more and spread it around (using the coarseness of the sugar to macerate it) but that didn't quite go as I'd hoped. Oh well.

    Add the egg and vanilla to your speckled butter.

    Now, we do the three bowl method for the cake. In the big bowl, the creamed butter mixture. In a smaller bowl (the one I started in and then decided was too small) the flour, salt, and baking powder. And in a bowl shaped like a measuring cup, the mint milk.

    First, we add about 1/3 of the flour to the creamed butter. Mix this in well.

    Now, about half the milk. Also mix in well.

    And then about half of what remains of the flour. Mix again.

    And the rest of the milk. Mix!

    And finally the last of the flour. Don't mix. Kidding! Mix it.

    Oh. Um. You should have preheated the oven just before the mixing started.

    Now, the chocolate chips. The Boy insisted on chips rather than chopped chocolate. And he was calling the shots with this one; I guess that's his version of making me a cake.  

    Butter and flour a cake pan. I had a 9 inch pan, which turns out was too big. You'll see why in a minute. If you have an 8 inch round pan, or an 8 inch square pan that would work fine. I'm going to use the 8 inch square pan next time.

    You can also line the pan with a bit of parchment paper.

    I would show you how to cut a round piece, but I know I'm going to need a tip to post in a few weeks during midterms and I think that sounds like a good one. Until then, you can leave the parchment out if you'd like.

    Bake the cake at 350 for about 30 minutes. You can test after 25 if you'd like but mine took almost exactly 30. Let it cool in the pan for about 20 minutes, and then on a rack until it's room temp.

    You see that flat bit in the middle?

    That's what I mean about the wrong pan size. There wasn't enough leavening in the mixture to keep everything together enough to lift that far from the edge. Another egg, or a bit more baking powder would work. Or, I could use a smaller pan so I don't have to go messing with recipe proportions.

    But, it was still cooked through, and it smelled minty. Tasted minty too, but it wasn't as green as The Boy was hoping. Still, he was glad it didn't have fake colour in it. I doubt I could convince him to use spinach juice though, like Taneasha did with her colourful cookies.

    There are definitely flecks of green in there though.

    This is a very moist moist cake, with a crumbly, delicate crumb. And the texture kinda reminded me of those "snack cakes" that my mom used to make from a box in the 80s. Quick cakes, never frosted, and always done in a square pan. So, I skipped the frosting step on this one.

    A bit of vanilla ice cream on the side would have been nice though.


    Tuesday
    Sep112012

    tillo-berry pie

    They really are fruits.

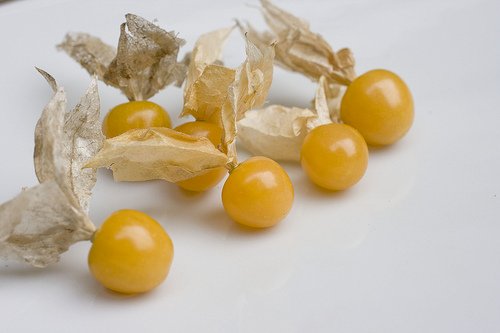
    If you've ever seen a cape gooseberry, you'll know where I'm going with this. They're also sometimes called 'husk cherries'. I was served one once as a garnish on a fancy dessert, and had no clue what it was, so I didn't eat it. I really should have.

    Because then I'd be able to tell you how they taste compared to a tomatillo.

    Yup, a tomatillo. Very closely related to the cape gooseberry, in look and in taste.

    Like tomatoes, tomatillos seem to have been relegated to the realm of savoury foods. They don't have to be though. They really are kinda sweet. They've got a bit of a citrus flavour to them too. And they pair nicely with cinnamon when you put them in a pie. It comes out as kinda 'mock apple' which is good I think, because it kinda eases people into the idea that you can actually eat this thing in a sweet dish.

    The trend lately with foods seems to be the addition of sweet things to savoury ones, so Recipe Guy and I (being contrary, as usual) decided that we'd take something typically savoury and make it sweet.

    Tillo-Berry Pie

    • about 1 pound of small tomatillos
    • 3/4 c sugar
    • 3 tbsp tapioca
    • 1 tsp lemon zest
    • 1/2 tsp cinnamon
    • 1/4 tsp nutmeg
    • double pice crust 

    If you want to make your own crust, you'll need

    • 2/3 c cold butter
    • 2 1/2 c flour
    • 1/2 tsp salt
    • 6-8 tbsp cold water

    I like making my own crust, and it's really quite easy. Unlike making cakes and muffins, you want all of your pie crust ingredients nice and chilly.

    Cut the cold butter into chunks about a tbsp in size, and dump in the flour and salt.

    Use a pastry cutter to cut it all together until the biggest chunks of butter are about the size of peas.

    Sprinkle on about 5 tbsp of ice water, and use a fork to cut the water into the flour. You don't want to "mix" this.

    Mixing causes gluten to form and stretch, which is great for cakes and bread, but really the opposide of what you want for a flaky tender pastry.

    Dump the very crumbly mixture out onto your rolling surface and add another tbsp or two of water.

    The way I deal with pastry now is patting and folding. Pat-a-cake, pat-a-cake baker's me! Resist the urge to do anything remotely related to kneading.

    At first, the folding will be a bit weird, and not much like folding. You'll just be picking up part of the dough and putting it on top of another part, and then pressing them together. If it doesn't hold well after a couple times of doing this, sprinkle on a bit of water, and then fold a few more times.

    Eventually, you'll end up with a lump that mostly sticks together after you pat it.

    Cut this lump in half, set the slightly smaller half aside, and flour the other one, your surface, and your rolling pin. Check as you roll to make sure that it's not sticking.

    If it is, use a knife to gently separate it from your surface, and flour both the surface and the pastry.

    Roll it until it's a good couple inches in diameter bigger than your pie plate.

    Use your rolling pin to help you carry it to the pie plate.

    The filling is pretty simple.

    Peel the pretty little paper lanterns off your tomatillos, and rinse them off.

    Recipe Guy seems to have one plant that makes slightly purple tomatillos. Apparently there are varieties that are entirley purple.

    Slice the tillos. Put them in a bowl.

    Dump the other stuff on top.

    Stir. Dump the filling into the crust.

    Easy as...

    The other half of your pie crust needs to be rolled out now. You can make a circle and put it on top whole (cut slits in it for steam to escape), or you can do a lattice top. A lot easier than you think and makes people say "ooo".

    Roll out your other half into a rectangle, and slice it into 7 strips.

    Lay 3 strips on the pie, and then fold the middle one back, and lay one of the remaining 4 across the two strips.

    Switch! One comes forward, two go back.

    Repeat until you run out of strips.

    Press the edges of the strips to the edge of the bottom crust, and use the scraps left after cutting your strips to fill in the blank spots.

    I recommend brushing the crust with a beaten egg now, rather than after it's been in the oven for 20 minutes. The egg makes is lovely and shiney, and helps its brown a bit too.

    Bake at 425 for 20 minutes, then turn down the heat to 350, and bake for another 30 minutes.

    The early high heat helps the crust brown and crisp before the fruit starts oozing juices all over it and making it soggy. The later lower heat makes those juices bubble into tasty sweet filling.


    It worked! It really worked!

    I think I'd like to put a few more tomatillos in next time, and maybe less cinnamon to make it less like a mock apple and more like a tillo pie, but it really did work!

    What "savoury" ingredient do you think would work well in a sweet?