Search
Categories
Have a request?
This form does not yet contain any fields.


    Entries by Taneasha (200)

    Friday
    Nov232012

    Homemade Eggnog

    To me, nothing reminds me of the holiday season than eggnog.  I’ve always loved the stuff.  As a kid, I wasn’t picky.  I even liked the instant eggnog mix that you just stirred into milk.  These days I find it difficult to find a brand of eggnog that I like.  The expensive ones with the best spices tend to have a really thick consistency that is way too snot like for me.  The ‘light’ ones have a better consistency, but they tend to also be light on spice.  Well, if you can’t find a suitable version in the store, it’s time to make your own. 

    Here’s what you’ll need:

    • 4 cups milk
    • 1 cup cream
    • โ…“ - ½  cup sugar
    • 2 egg yolks
    • Piece of a vanilla bean
    • 1 whole nutmeg

    A lot of the recipes I’ve seen online just say to throw everything into a blender.  For some reason the thought of drinking raw eggs makes me want to hurl, though, so I made a cooked version.  So, pour your milk and cream into a pan over low heat. 

    Very carefully cut your nutmeg in half.  I’ll be honest, I don’t have any brilliant tips on how to do it safely. 

    Actually, scratch that, I’ve just had an epiphany.  You’re going to need to grate the other half of the nutmeg later, so just grate that half off now, and set it aside.

    Then drop the intact half into the milk. 

    I can’t believe I didn’t figure that plan out before now.  It addresses two safety problems you see.  Not only the dangerous act of cutting a small, round, hard object in half, but also, grating the nutmeg while it’s whole will hopefully prevent you from accidentally grating your finger. 

    Next up is the vanilla bean.  Cut a third-ish of it off. 

    Carefully split it down the middle. 

    Then just run the back of your knife along the inside scraping out the seeds. 

    Plop them into the milk and whisk to get them to separate and distribute themselves throughout.     

    Now it’s time to move to the eggs.  Drop your yolks into a mixing bowl along with the sugar.  I used ½ cup, which made it pretty sweet.  Next time I think I’ll use โ…“ cup instead.  I’d say, if you’re unsure, start with โ…“ cup and you can taste it when it’s finished but still hot, and add more if you need to.

    Mix on medium speed until it all comes together.  You probably noticed that my yolks are a dark orange color.  That’s because they come from local, pasture raised hens.  They are seriously amazing. At this stage, go ahead and scrape everything down, then turn the mixer back on and allow it to run for a minute or two. 

    (Don’t forget to stir your milk.)  This is pretty close here.  Just one more scrape down and another quick whirl.  

    Now you can step away from that and put your full attention on the milk mixture.  Go ahead and bump the heat up a little.  Stir constantly until it comes just to a simmer.  My nutmeg conveniently lodged itself in my whisk, but if yours doesn’t, you’ll want to fish it out now. 

    This next part is another do as I say not as I do moment.  With the mixer running on medium low speed, slowly pour in the hot milk.  As you can see from the picture, there was nothing slow about my pouring.  Perhaps trying to take pictures while pouring a full pan of hot liquid into a running mixer isn’t the brightest idea.  Fortunately, I didn’t burn myself, but I did get milk all over the bar, and was afraid I could have curdled the eggs the hot liquid in that fast. 

    Allow the mixer to run while you give the pan a quick wash.  The mixture should be nice and frothy. 

    Now, if you had a pouring mishap like I did (or even if you didn’t) you might want to pour the mixture through a sieve as you return it back to the pan, just to make sure it’s nice and smooth. 

    It should look something like this:

    Sprinkle on your reserved nutmeg.  I know it looks like a lot, but this is eggnog we’re talking about.  Nutmeg is what makes it special. 

    Stirring constantly, bring the mixture up to a boil. 

    Then turn off the heat, but continue to stir for a couple minutes just to make sure it doesn’t scorch on the bottom. 

    You’ve done it!  You’ve made homemade eggnog!  And I’m going to bet it’s the best you’ve ever had.  You have a couple of options at this point.  Go ahead and taste it to see if it needs anymore sugar or nutmeg.  First thing you have to decide is do you want nog in your eggnog.  I don’t drink alcohol, but if you do, go ahead and add some good rum, or whatever your heart desires.  Next, you have to decided if you want to drink it hot or cold.  If you like it hot, go ahead and ladle it into mugs.  Personally, I prefer eggnog cold.  For that, go ahead and put a lid on the pan and allow it to cool.  Once it has, pour it into a vessel and refrigerate for several hours. 

    When serving, simply grate a bit more nutmeg over the top to make it fragrant and pretty, and enjoy! 

    How do you like your eggnog?


    Friday
    Nov162012

    "Green Bean" Casserole

    So I was talking to Hubby about the fact that I’ve totally neglected Thanksgiving posts this year.  He said I should make green bean casserole, which is kind of ironic considering he doesn’t like green beans or anything even resembling a casserole.  I know green bean casserole is a very traditional side for Thanksgiving, but I’ll be honest, I’m not a fan a green beans either.  Not to mention the canned crap it’s usually made with. Hubby suggested I use asparagus.  Why not?  I love asparagus.  I shouldn’t admit this in public, but I’m pretty sure he’s a genius.  So, if you like your traditional green beans, you can use them, or broccoli, or cauliflower, but I’m sticking with asparagus. 

    Here’s what you’ll need: 

    • 1 lb. asparagus
    • 3 or 4 green onions
    • Handful of crimini mushrooms
    • 3 Tablespoons butter
    • 3 Tablespoons flour
    • ½ teaspoon pepper
    • 2 cups milk
    • ½ cup cream
    • 1 teaspoon salt  
    • ½ teaspoon dried oregano (Mexican if you have it)
    • ½ teaspoon dried parsley
    • ½ teaspoon onion powder
    • ½ teaspoon garlic powder 

    For the onions: 

    • 1 onion
    • 1 cup buttermilk
    • ½ teaspoon salt
    • ½ teaspoon pepper
    • 1 cup flour
    • ½ teaspoon salt

    The first thing to do is slice the onion.  Cut the onion in half (I like to leave the root end on to hold it all together) and make very thin slices. 

    Repeat with the other half. 

    Separate the slices and place them into a shallow dish like a pie plate.  (If ever there was a time for onion goggles, this is it.) Measure out 1 cup of buttermilk.

    Add ½ teaspoon of salt.

    And ½ teaspoon of pepper.

    Stir that together and pour over the top of the onions. 

    Toss the onions to make sure they’re all coated, then cover them and set them aside.

    Now onto the star of the show, the asparagus.  After it’s washed, bend each stalk and allow it to break where it will.  Anything below the break is tough and goes in the trash. 

    As for the rest, cut them into thirds and throw them into a large bowl. 

    Next up, the mushrooms.  I always wash my mushrooms. 

    I know, I’ve heard all the nonsense about water making mushrooms soggy or tough or whatever else it’s supposed to do.  Well, quite frankly, I don’t believe any of it, and regardless, I’ll take my chances.  If any other piece of produce looked like this, it would be getting a good bath. 

    Cut your mushrooms into chunks.  Do what you want with the stems.  I didn’t want to deal with trimming them, so I just discarded them. 

    Add them to the bowl and slice your green onions.  I ended up with maybe ¼ cup. 

    And into the bowl. 

    Now it’s time for the cream sauce.  As I’ve mentioned before, condensed cream of blech soups are nasty and not allowed in my home.  It just isn’t that hard to make a cream sauce.  In a pan over medium heat, melt 3 Tablespoons of butter.

    When it’s completely melted and bubbling, sprinkle over 3 Tablespoons of flour.

    Stir those together until they look something like this.

    Sprinkle in ½ teaspoon of black pepper. 

    Stir that around for 45 seconds or so and then pour in 2 cups of milk.

    Stir that together, then add ½ cup cream, 1 teaspoon salt, ½ teaspoon each of dried oregano, dried parsley, onion powder, and garlic powder. 

    Stir constantly until it comes to a boil and begins to thicken. 

    Remove it from the heat and pour it over your bowl o’ veg. 

    Stir that until everything is evenly distributed and pour it into a baking dish.  Smooth out the top and set it aside while you get back to the onions. 

    Preheat your oven to 450°.  In a storage bag, mix together 1 cup flour and ½ teaspoon salt. 

    Remove the onions from the buttermilk and allow the excess to drip off.  (if you’re planning to make savory biscuits, that would be a fabulous second round use for this buttermilk)

    Drop them into the flour. 

    Inflate the bag like a balloon and shake shake shake. 

    You should end up with something like this.  If you start getting sticky clumps, add more flour and shake some more.

    Line a sheet pan with foil and spray it liberally with cooking spray.  Sprinkle the onions around trying your best to get close to a single layer. 

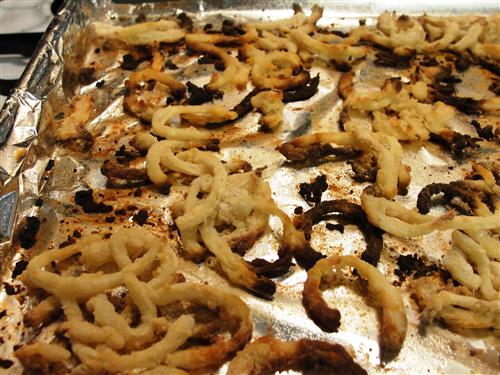
    Spray the onions liberally with the same cooking spray and into the oven they go.  9-10 minutes is all it will take for them to be browned and crispy. 

    *Warning, the oven at this temperature is hot and even with no smoke can send up a wave of air hot enough to set off the fire alarm, thereby scaring the bejesus out of the dog, for which it will take many treats to be forgiven. 

    Now back to the casserole part of this.  Turn the oven down to 350° and place the pan in, uncovered for about 50 minutes.  It will be nice and bubbly and starting to brown on top. 

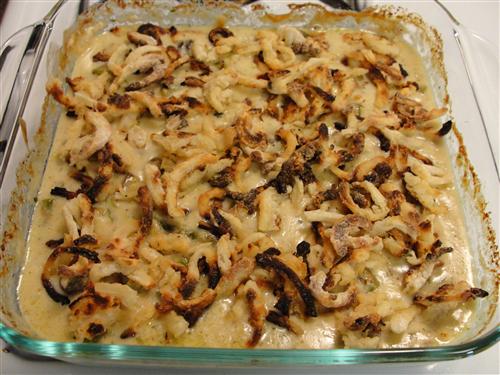
    Give it a good stir then chop your crispy onions into slightly smaller pieces and sprinkle them over the top.  (Obviously it wouldn't be the same, but you could save yourself some work and probably get a similar effect by mixing panko with melted butter and onion powder and sprinkling that over the casserole before baking) 

    The heat emanating from the casserole will warm the onions, so just leave it to cool for a good 20 minutes, and serve or put it on the table with all the other fabulous sides you’ve made.  You will be blown away by what a difference it makes to skip the can and make your own. 

    What is your least favorite Thanksgiving side dish?