Search
Categories
Have a request?
This form does not yet contain any fields.


    Entries by Taneasha (200)

    Friday
    Mar112011

    Tacos in Pasta Shells

    Ok, let’s be honest here, this isn’t the prettiest food ever made.  What it lacks in beauty, however, it more than makes up for in flavor.  I don’t know if I can say for certain that this is my husband’s favorite meal I make, but it’s definitely top three. 

    Unfortunately, I can’t take credit for this fabulous creation, and I have no idea who to give credit to for it.  I got the recipe from my sister-in-law, who got it from a church cookbook, I believe.  I have made very few changes to the original I was given, so a big thanks to whomever the original creator may have been. 

    Alright, let’s get started.  Here’s what you’ll need:


    1.25 Pounds lean ground beef

    8 oz. cream cheese

    5-6 green onions

    1 Large bottle of Taco Sauce

    3 cups grated cheese (I used Colby jack and extra sharp cheddar)

    1 box Jumbo Shells Pasta

    3 cups broken corn chips


    I forgot to include the ground beef in the picture of ingredients (I'll probably do that a lot), but here it is. 


    Chop the green onions and throw them into a bowl with the cream cheese.  Set them aside for now. 


    Brown the ground beef, draining excess oil if necessary, and pour the hot meat over the cream cheese.  Yes, that is diced onion you see in my ground beef, and no, I didn’t include it in the list of ingredients.  It’s not strictly necessary, but pretty much, if I’m using ground meat, there is going to be diced onion cooked in with it.  Not only does it add flavor, but when you’re buying organic meat, it can get pretty expensive, and adding onion makes it go a bit further.


    Cover the bowl and leave it while you work on the pasta.  Basically just follow the directions on the package.  When it’s cooked, drain it and rinse it with cold water to cool the shells down.  Stir together the meat mixture.  My husband said I couldn’t post a picture of the filling by itself.  He says it looks like brains.  So, let’s just get to the stuffing part. 


    First, this is probably a good time to preheat your oven to 350°.  Also, you’ll need to drizzle the bottom of your pan/pans with taco sauce.  Just enough to keep the shells from sticking.  This recipe makes 24 shells.  I like to separate them into two pans, because with only two of us in the house, that easily feeds us twice.  I just put one pan in the fridge uncooked.  You can plan on about 4-6 shells per person, depending on how hungry everyone is.    


    Ok, stuffing… Gently open a shell and allow the excess water to run off. 


    Using a spoon, fill it with meat mixture, but not so full that it can’t close.  I like to overfill them slightly, then squeeze them shut (gentle, they split easily) and wipe any excess off, back into the bowl.


    Line them all up in the pan and drizzle them with taco sauce.  Don’t skimp here.


    Cover with foil and bake for 15 minutes.  Now for the fun part.  Break up your corn chips and sprinkle them over the top.  Looking better by the minute, isn't it? 


    Next comes the cheese.  When it comes to cheese, I rarely think a little is sufficient. 


    Now pop it back in the oven for another 15 minutes.  It’s amazing what a little heat does to a pile of shredded cheese.  It has now transformed into bubbly, golden, deliciousness. 


    Ok, so it kind of looks like nachos in that shot, but it is so much more.  Scoop out the desired number of shells and sprinkle with a few more green onions. 


    **Disclaimer**  

    Authors Kitchen is not responsible for discomfort or missing buttons caused from eating “just one more shell”.       

    Thursday
    Mar032011

    PITA - and I don't mean Pain In The Ass.


    I’ve been having a serious craving for a pita sandwich, and well, I don’t really have a place to get good pita bread.  On top of that, Seeley’s last post made me really want to try my hand at hummus, and what’s my favorite accompaniment to hummus?  You guessed it… pita bread.  Well, as I’ve learned with a lot of other things, when you can’t buy what you want, make it.  So I did. 


    Here’s what you’ll need:

    1 ½ - 2 cups all purpose flour

    1 cup whole wheat flour

    1 packet active dry yeast*

    1 ¼ warm water

    2 Tablespoons + 1 teaspoon sugar

    ½ teaspoon salt


    I really like to use my stand mixer for making bread, but if you don’t have one, feel free to pull out the ol’ wooden spoon and elbow grease.  Either way, in your mixing bowl, put a teaspoon of sugar and about ½ cup of the warm water.  Sprinkle the yeast over the top.  *(if you’re using instant yeast you can skip this step and just throw everything into the bowl together)


    Stir it in and give it a good five minutes or so.  If you’re yeast is healthy, you should start to see bubbles.  This means your yeast is working.


    Add the rest of the water and the remaining ingredients to the bowl, minus ½ cup of the all purpose flour.  (so just 1 cup of each flour at this point)


    Mix on medium low speed until it comes together into a messy dough. 


    Switch to your dough hook and sprinkle the reserved ½ cup of flour over the top. 

    Knead on medium speed for 5 – 7 minutes (if you’re kneading by hand, it’ll be about 10 minutes).  If, after a minute or two, the dough is still really sticky and hasn’t cleaned the sides of the bowl, add the remaining flour a tablespoon or two at a time until the dough cleans itself off the sides of the bowl. 


    While it’s kneading, butter the sides and bottom of a bowl or container at least twice the size of the dough.  With floured hands, remove the dough from the mixing bowl and shape it into a ball-ish shape.  Place it into the bowl and turn it to get butter on the bottom side, then flip it over. 


    This helps to keep it from drying out while it rises.  Cover the bowl with a damp kitchen towel and leave it for about an hour.  When you come back, it should have nearly doubled in size.  Flour your surface, dump out the dough, and sprinkle it with more flour.  Deflate it with your knuckles. 


    Flatten the dough and fold it into a packet/envelope like shape.  This makes it easy to divide the dough into mostly equal pieces without having to weigh them. 


    My dough cutting tool of choice is a pizza wheel, but you could use a knife.  Cut the dough in half.

    Cut the halves in half.  Cut the quarters in half. 


    Take a piece of dough and flatten into a disk.

    Fold the sides together, turn it a quarter turn and fold the opposite sides together.                                                                                                                     

    Turn and fold.  Turn and fold. 


    When they’re all pinched together, put your hand over the ball of dough like a loose cage and move it in little circles.  This will tighten everything up. 


    Set the finished balls of dough aside and keep them covered with a damp towel. 

    I doubled the recipe so that I would have leftovers, because they freeze beautifully, and this is where you would do that.  Any you don’t want to bake immediately, place on a parchment lined cookie sheet and place them in the freezer.  When they’re frozen (like 3 hours) drop them into freezer bags and freeze them until you want to use them.  When you’re ready, just thaw, and continue on from here. 


    First we need to prep the oven.  Place a sheet pan upside down on the bottom rack, and remove any other racks.  Then heat your oven to 450°.


    On a well floured surface, take one ball of dough and flatten it with your palm.  Then roll it with a rolling pin, turning a quarter turn between each pass to keep it from sticking.  It should be no more than ¼ inch thick.  Cover, once again with a damp towel until you’re ready to put them into the oven.


    When the oven is hot, throw the disks of dough onto the sheet pan. 


    Within a minute or two, something magical will happen and they’ll do this:


    After about 5 minutes they should start to brown slightly.  Using a metal spatula, carefully remove them from the oven and place them on a cooling rack or plate. 


    ***Be very careful!  They are filled with extremely hot steam!


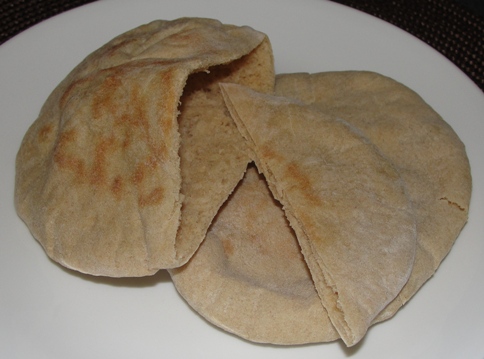
    As they cool they’ll start to deflate.  You might have to help them along once they’ve cooled down if they’re still a little puffy.  Wrap in a kitchen towel to keep them soft, or serve them while they’re still warm.  Cut them into wedges and serve with hummus or as a side to chili or soup.  Or open them up and fill them with your favorite sandwich ingredients.  I like smoked turkey, shredded sharp cheddar, avocado and tons of sprouts. 


    What’s your favorite thing to do with a pita?