Search
Categories
Have a request?
This form does not yet contain any fields.


    Entries by Taneasha (200)

    Friday
    Mar022012

    I Want My Cheesy Poofs!!

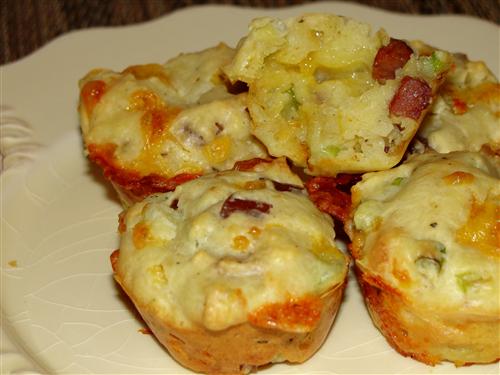
    Obviously that was probably not the picture that popped into your mind when you read the words cheesy poofs.  Well, I have something so much better than those bright orange, artificially flavored, crunchy cheese snacks.  My cheesy poofs are little, two bite hors d’oeuvres.  Their texture is somewhere between a muffin and a biscuit and they’re loaded with smoked sausage, green onion, and tons of cheddar cheese.  Seriously, look up at that picture again.  Haven’t seen many things more drool worthy than that, have you?  And best of all, they’re simple to make!

    Here’s what you’ll need:     

    1 ¼ cup flour
    1 cup light cream
    1 egg
    1 teaspoon baking powder
    ½ teaspoon salt
    ½ teaspoon coarse pepper
    ¼ teaspoon garlic powder
    1 ½ cups grated cheese
    ½ cup green onion
    1 cup diced smoked sausage

    I used 10 of the little Beeler’s smoked sausages.  If you can’t find that brand, I’m sure you can use one of the others.  Take each little sausage and cut it into quarters lengthwise. 

    Then cut those strips into little pieces. 

    Throw them into a pan over medium heat and cook them just long enough to cook off a little of their liquid and brown them slightly.  Then just set them aside to cool while you work on the other stuff.  Go ahead and grate your cheese, I used a combo of extra sharp and medium cheddar, and chop your green onions.  I think I used 7 or 8. 

    If you grind your own black pepper, turn it just about as coarse as it will go, and crack about ½ teaspoon. 

    Throw all your dry ingredients into a mixing bowl and whisk them together.

    In a separate container, whisk together the cream and egg.

    Add the cheese, onion, and cooled sausage to the flour mixture. 

    Stir until everything is evenly distributed and coated, then pour over the cream. 

    Stir just until the liquid is incorporated.  It’ll be a fairly thick mixture, more like a dough than a batter. 

    Spoon the mixture into a mini muffin tin.  My pan is coated with silicone so things won’t stick, but if you’re pan isn’t, you might want to spray it or butter it. 

    Fill each up to the top, pressing the mixture down to level it out and fill the corner of the cup. 

    Place the pan into the freezer for 30 minutes.  This step helps to chill the fat and relax the gluten, which in turn makes them tender and well… poofy!  After 15 minutes, preheat your oven to 375°.  When the 30 minutes are up, pull the pan out of the freezer and pop it into the oven for 22 – 27 minutes.  During that time, glorious things are going to happen. 

    They should be just starting to brown on top, and will probably have brown cheese extracurriculars (as I like to call them) around the edges.  Don’t worry about those… they are crispy and delicious. 

    Remove them from the pan and allow them to cool for just a few minutes before devouring.  Pile them onto a plate for your guests… or yourself. 

    Ok, I might not recommend eating that many in one sitting, but you might not be able to stop yourself.  I mean, just look at that sausagey, oniony, cheesy goodness. 

    If can pretty much guarantee you’ll be singing this song after your first bite.    


    Friday
    Feb242012

    Finally! We Bring You Brownies!

    How have we possibly been so remiss?  We’ve been posting for more than a year and have shared more than 100 recipes, but not one of them was for brownies!  How is that even possible?  Well, in an effort to make amends for this egregious oversight, I bring you not just plain old brownies, but rich, chocolaty, chewy, gooey, caramel covered, pecan studded, turtle brownies.  You’ve waited long enough, so let’s get started. 

    Here’s what you’ll need for the brownies:

    โ…“ cup cocoa
    โ…“ cup boiling water
    ¼ cup vegetable oil
    6 Tablespoons butter
    2 cups sugar
    4 oz. chopped dark chocolate
    ½ teaspoon salt
    2 teaspoons vanilla
    3 eggs
    1 ½ cups flour
    You’ll also need about ½ cup of chopped pecans, but they don’t go inside the brownies.  Just set them aside for much later. 

    Before you start with the food, line a 9x13 pan with parchment and preheat your oven to 350°

    When that’s done, sift the cocoa into a sauce pan and pour over the boiling water.

    Whisk over low heat until it becomes smooth.

    Whisk in the sugar, oil, salt, and butter. 

    Continue whisking over low heat until a good part of the sugar is dissolved and the mixture becomes very shiny.  Turn off the heat and add the chopped chocolate. 

    Stir that in until it’s completely melted and incorporated.  In a separate bowl, crack your 3 eggs and beat them. 

    Now, before adding them to your chocolate mixture, you need to make sure it’s not too hot.  Your finger will make the perfect thermometer for this.  Bathwater warm or cooler is fine.  If it feels hot, give it a few minutes to cool down before adding the eggs.  When it’s ready, go ahead and pour them in along with the vanilla. 

    Whisk the mixture until the eggs are completely incorporated.

    Sift the flour over the top.

    Lose the whisk for this part and carefully fold or stir the flour in with a spatula.  You don’t want to over mix at this point.  When the flour is incorporated, pour the batter into your prepared pan.

    Spread it to the edges and level it out as best you can. 

    Now, into the oven for 30 – 35 minutes.  A toothpick inserted 1 inch from the edge should come out clean, and it’ll be shiny and crackly on top. 

    Put those aside to cool completely.  I know, your whole house smells like brownies and it’s almost impossible, but you can do eet.  Once they’ve finished cooling, it’s time to start on the caramel.


    Here’s what you’ll need:

    ¾ cups half & half, divided
    3 Tablespoons syrup
    ¾ cups sugar
    2 Tablespoons butter
    ½ teaspoon salt
    1 teaspoon vanilla

     (this caramel is on the salty side, which I like, but feel free to reduce the salt to 1/4 teaspoon if you prefer.)


    Place everything but the vanilla and ¼ cup of the half & half into a pan over medium low heat.

    Stir until the sugar is mostly dissolved, then increase the heat to medium and continue stirring until it comes to a boil.  Put the lid on and set a timer for 3 minutes.  During that time, get a little dish of ice water and wash your spoon, or get a clean one out.  When the time’s up, remove the lid.  It’ll probably look something like this. 

    When it’s closer to ready, it will look more like this, though. 

    Drip a little of the hot syrup into the water. 

    It should come together into a ball that will mostly hold its shape, but is easily molded with your fingers. 

    When you get to that point, turn off the heat and add the vanilla and half & half. 

    It’ll hiss and sputter, but just stir, and it will calm down.  When the boiling has stopped, pour the caramel into a heatproof container set atop a hot pad or dish towel. 

    As you can see, my caramel has little brown specks in it.  That just means it got a little dark in a spot on the bottom.  I had thought to toss it and start over, but it tasted so amazing, I decided to keep it.  Once it’s on the brownies, you’ll never even know.  Give the caramel a while to cool.  You want it to be a soft, spreadable consistency, but not runny.  I got impatient and put mine in the fridge for a bit.  While it cools, back to the brownies.  Remove them from the pan and cut them down to fit snuggly into a square pan. 

    If you have a 9x9, that would be ideal.  Mine was 8x8, but I made it work. 

    You should have a piece something like this leftover.  See those edges there?  Those are for you to eat. 

    Remove the rest of the edges, and cut the remaining chunk into little squares.  About ¾ of an inch or so. 

    I know, you think I’ve surely gone over the cliff, but stay with me.  I promise I don’t need a padded cell just yet.  So, back to the brownies that are in the square pan.  Pour the cooled caramel over the top, reserving about 2 Tablespoons. 

    As you can see, I decided to line the pan with parchment for easy removal and cutting when they’re done.  Spread the caramel to the edges and sprinkle โ…“ cup or so of the chopped pecans over the top. 

    Now, take your little brownie cubes and arrange them sort of haphazardly across the surface.  Press them gently into the caramel.

    Heat the remaining caramel for 5 – 10 seconds in the microwave, just to thin it a little.  Then drizzle it all over the top. 

    Last, but not least, sprinkle on the remaining chopped pecans. 

    Could you just leave the whole thing in one pan and spread the caramel and pecans over the top?  Sure, but why would you when you can create a masterpiece like this?

    I hope this has gained your forgiveness for our brownie blunder.  Is there something you’d really like to see that we’ve somehow overlooked?