Search
Categories
Have a request?
This form does not yet contain any fields.


    Entries in omg yum (69)

    Friday
    May272011

    Pancakes with Homemade Blueberry Syrup - No Mayhem?

    That’s right, pancakes.  I know, it seems like something so basic, but you wouldn’t believe how many times I’ve seen thin, rubbery discs served with maple flavored corn syrup.  Pancakes should be soft and fluffy, and nothing beats homemade fruit syrup. 

    Let’s start with the syrup.  I like to make it the night before so that it has plenty of time to cool.  It is so simple to make your own syrup, I don’t know why no one does it.  It takes only three ingredients and probably 20 minutes or less. 


    So, here’s what you need. 

    1 heaping cup blueberries
    ¾ cup sugar
    1 Tablespoon lemon juice
    1 teaspoon butter (optional)

    Yes, I know I said three ingredients, and there are four listed, but the butter is not strictly necessary.  Its only purpose is to prevent foam.  Either fresh or frozen blueberries will work just fine for this.  I had a big bag of frozen ones, so that’s what I used.  If you use frozen, you’ll need time for them to thaw before making the syrup.  Once you have a heaping cup of thawed blueberries, throw them into the blender with 1 tablespoon of fresh squeezed lemon juice.  Blend until smooth. 

    Pour the puree into a sauce pan and add the sugar. 

    You’ll notice my sugar always looks a bit off white.  That’s because I always use organic sugar, and it’s less refined.  Anyway, stir in the sugar and add the butter. 

    Turn the burner to medium heat and stir constantly until it comes to a boil.  Allow it to boil for about 2 minutes.  The bubbles will start to kind of stack up on top of each other like this:

    That’s it.  You’ve successfully made blueberry syrup!  Just pour it into a glass container and allow it to cool.  Be careful, though, mixtures like this are VERY hot. 

    Now onto the pancakes. 


    Ingredients:

    2 large eggs
    1 ¼ cups buttermilk
    3 tablespoons vegetable oil
    1 teaspoon vanilla
    1 ½ cups flour
    ¾ teaspoon salt
    1 teaspoon baking soda
    1 teaspoon baking powder
    2 tablespoons sugar


    I know your first question will be do I have to use buttermilk?  Yes, you do.  Regular milk will not produce the same results.  You can apparently add vinegar to regular milk to simulate buttermilk, but the idea squicks me out a bit, so if you want to do that, you’ll have to google it yourself. 

    Ok, pancakes.  In a mixing bowl, whisk together all the dry ingredients.  In a separate bowl (or measuring cup) whisk together the wet ingredients.  Pour the wet ingredients into the dry and whisk briefly.  You just want to get everything thoroughly combined.  A few remaining lumps will be fine. 

    I like to use a griddle so that I can make several pancakes at once, but a pan will work just fine.  Using a paper towel, butter the griddle. 

    Wipe most of the butter off so you can just barely see it on the surface. 

    When the griddle reaches 350° you’re ready to cook.  If you're using a pan, you can test the temperature with a drop of water.  It should start to sizzle as soon as it touches the pan.  If it just sits there, the pan isn’t hot enough.  If it skips right off the surface, it’s too hot.  Pour your batter for whatever size pancakes you want. 

    I think I used about ⅓ cup of batter for each one.

    Allow them to cook until you see bubbles on top and the edges start to look dry. 

    Now’s the time to flip.  Cook them for a couple more minutes.  They should be golden brown on both sides and should spring back if you press lightly on the surface. 

    Stack them up and drizzle them with your fabulous blueberry syrup. 

    Fluffy, tender, delicious.  


    Friday
    May202011

    Moving Mayhem - Bread Pudding Edition

    Well, it’s really happening.  The move is finally here.  But before we go, I need to use up some of my special ingredients.  I just can’t bring myself to throw something like vanilla beans in the trash.  After much thought, I decided bread pudding would be a great means of emptying my cupboards. 

    Here's what you'll need:

    4 large croissants
    2 eggs
    2 cups half and half
    1 ½ cups vanilla sugar
    1 vanilla bean
    1 teaspoons cinnamon
    ½ teaspoon nutmeg
    1 teaspoons vanilla extract
    1 Tablespoon brown rice syrup
    ½ teaspoon salt

    Although I highly recommend having these ingredients on hand, I understand that you may not have all of them.  If you don’t have vanilla sugar, you can certainly make it for next time.  Just save the used vanilla bean, let it dry, and put it in a container with some sugar.  If you don’t have a vanilla bean, you’ll just have to go buy one… or I guess you could make a different flavor of bread pudding.

    Ok, let’s get this show on the road.  First thing you need to do is butter the bottom and sides of a square pan.  8 or 9 inch will work just fine. 

    Next, preheat the oven to 350°.  Then, tear your croissants into smallish pieces.

    When you’ve done them all, it should look something like this:

    Next comes the custard.  Crack two eggs into a mixing bowl or you can use a 4 cup measuring cup like me. 

    Beat the eggs slightly, add the half and half, sugar, salt and vanilla extract, and whisk until you have little bubbles on top.  Then add the syrup. 

    More whisking, then finally, the fun part… the vanilla bean.  With a sharp knife, slice it lengthwise down the middle. 

    With the back side of your knife (not the sharp part) open one half of the pod and scrape out the seeds. 

    Set the other half aside for now.  Plop the vanilla seeds into your egg mixture. 

    Whisk whisk whisk!  You’ll see the seeds mostly separate.  Little clumps will probably remain, but don’t fret. 

    Now for the spices.  First comes the nutmeg.  Freshly grated only please. 

    Seriously, don’t use the pregrated stuff in a bottle.  You can get a nutmeg grater rather inexpensively, and then you’ll always have good nutmeg on hand.  The stuff in the bottle loses its flavor so quickly, but the whole nuts are good for just about ever. 

    Last but not least is the cinnamon.  This is another thing that loses its flavor quickly, but the good stuff you can’t grind yourself, so just buy it frequently.  If you can find it in bulk, it’s a good way to get it.  Whisk one last time, getting everything incorporated and pour it over your croissant pieces. 

    Press down so that every piece gets a chance to absorb all of that vanilla goodness. 

    Into the oven it goes for 35 – 40 minutes.  When I finally looked up from what I was doing, I was met by this precious site. 

    We’ve finally left the snow behind (I think) and Otto isn’t taking one moment of sunshine for granted.  So, I’m probably biased, but I could just look at that cutie pie all day.  Ok, back to bread pudding.  When it’s done, it should be nice and golden brown on top and a knife inserted into the center should come out clean.

    Allow it to cool for at least 20 minutes before cutting.  You can even cool it completely, refrigerate it, and serve it cold.  Either way is fabulous.  While it’s cooling, let’s start on the vanilla bean whipped cream.  Pour 1 tablespoon of sugar onto a plate.  With the back of your knife, scrape the seeds from the remaining vanilla bean half and add it to the sugar.

    With a fork, smoosh them together.  (yes, smoosh is a technical term)     

    In a glass measuring cup, measure one cup of heavy cream and add the vanilla/sugar mixture. 

    Whip until you get stiff peaks.  (Is it only romance writers whose minds go instantly into the gutter with a phrase like that?) 

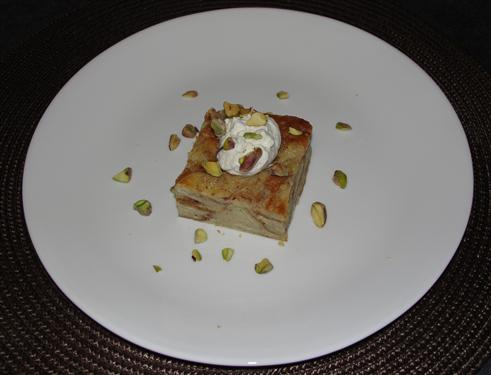
    Look at all those little vanilla seeds in there.  Isn’t it pretty?  Now, cut your bread pudding into squares and serve with a dollop of whipped cream and some chopped nuts.  I had pistachios I needed to use up. 

    Take a bite and be swept away to vanilla heaven.  Nothing beats the flavor of real vanilla beans. 

    So, if you were moving, and had to give up everything in your kitchen, which of your ingredients would you be sure to use up?